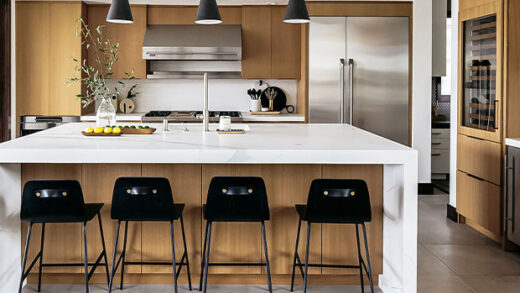
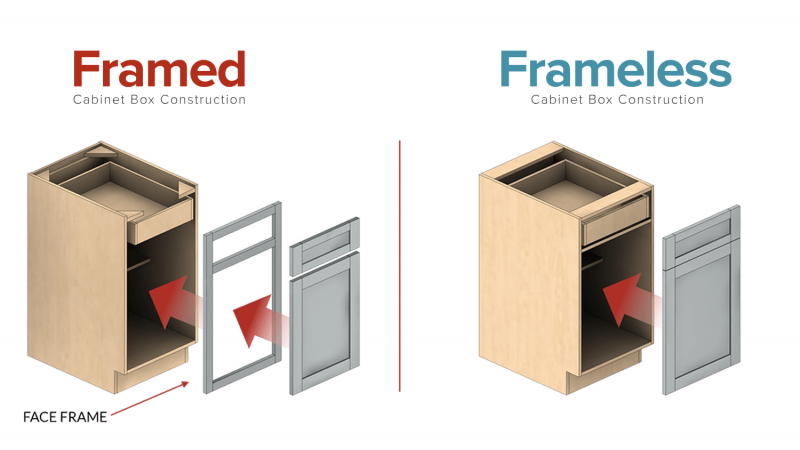
Building cabinet boxes is one of the simplest yet scariest do-it-yourself projects. Every builder will have a preferred method because there are so many different ways to construct cabinet boxes.
Building cabinets may seem like a daunting task, but all it entails is a lot of boxes! In this cabinetry series, I’ll first show you how to build a simple cabinet box.
Our built-in entertainment center’s cabinet was constructed using the same technique. Continue reading!
Table of Contents
How To Make A Cabinet Box?
Let me first say that this was our first time building a cabinet before we begin with our step-by-step tutorial on how to make a cabinet box.
Even though we are by no means experts, we want to let people know that they can do it.
Of course, we made errors along the way, but that is how we grow.
But in the end, we are very happy with the outcomes.
We watched and studied a lot of different techniques because this was a new skill for us.
Our favorite method was from Bourbon Moth Woodworking on YouTube.
He seems to be simple to grasp, and entertaining to watch, and his methods allowed us to achieve amazing results.
Even so, we did make ours slightly differently while still adhering to his general recommendations.
1. Cut Lumber To Size
You should first decide on the final dimensions for your cabinet.
- Cut the wood for the bottom and sides of your cabinet box once you have an idea of how big each cabinet will be.
- Make all of our cuts at once; you’ll discover it’s simpler.
- After that, arrange each cabinet box’s components in stacks.
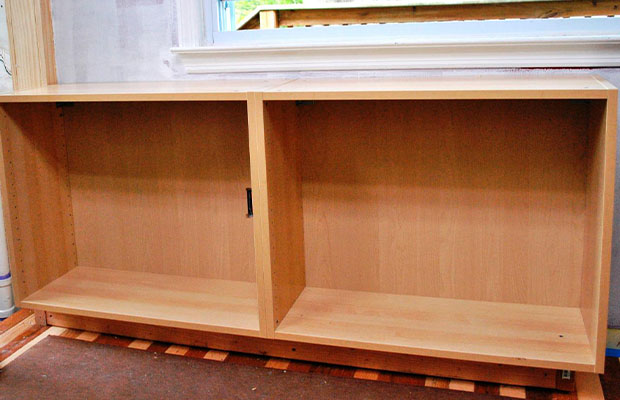
- For that cabinet box, there will be 4 pieces because some of our cabinets have shelves.
- Additionally, cut four Prime strips from leftover MDF or plywood.
- Then, mark each board where a groove or dado cut needs to be made with a router on each one.
We believe a router to be more accurate than a table saw, although it is certainly possible to make these cuts with a table saw.
2. Cut Dado In Wood
A dado is a wood groove. They are utilized in interlocking applications.
The construction of cabinets, bookshelves, drawers, and door panels frequently uses interlocking joints.
- The router should first have a 3/4″ straight cut bit installed in it.
- Determine the distance from the bit to the edge of the router before beginning the dado cut. For instance, the distance between the edge of the router and our bit is 3 1/2 Prime.
- The straight edge will then be clamped 3 1/2 Prime away from the line where you want to make the cut. The dado groove for the shelf in the cabinet looks like this.
- On each side piece for the shelf on this cabinet box, a dado cut was made.
- The cabinet’s bottom board should then have dado cuts made on both sides of it.
- The three pieces for the cabinet box were then all given an 1/8″ dado with a 3/4″ back edge.
- Place the fence on the table saw 3/4″ from the blade to create this dado without using a specific dado blade for the saw.
- Set the table saw’s blade height to 3/8”.
- After that, you’ll push the board through with its back edge up against the fence.
- With the fence in this position, cut all the necessary openings.
- The fence is then adjusted so that it is approximately 13/16″ from the blade.
- You will then have a 1/8″ groove along the back edge of the bottom and sides.
You May Also Like:
Things To Consider
There are a few things to think about before you begin cutting and assembling. You can avoid a lot of mistakes and create a better cabinet box by doing some advance planning.
Choose Your Plywood Wisely
There are many options available when it comes to the various plywood types, but not all of them work well for making cabinets. Typically, you want to look for sheets that are labeled “cabinet grade” for better quality. Spend a little more money to ensure that they last and look good if you’re going to all this trouble!
There’s usually a “good” side to the plywood sheet. There should be no knots or flaws on this side. Even though the other side will be of lower quality, it will probably be concealed by the wall, a cabinet next to it, or an end panel. For the cabinet’s interior, use the favorable side.
My cabinets are made from prefinished birch plywood (that’s why it’s shiny). Prefinished indicates that a clear protective top coat was applied at the manufacturing facility, saving me a ton of time. I want to paint the cabinet’s doors, drawer fronts, and end panels, but the interior will still be made of natural wood and have a clear coat on it.
Plan Your Plywood Cuts
The fact that plywood sheets are so large is one of the most difficult aspects of working with it. I have ¾” plywood sheets cut down the middle lengthwise at the store. I now have two 2′ x 8′ panels that are small enough to easily fit into my car and onto my workbench.
When preparing your plywood cuts, pay attention to the direction of the wood grain. The grain should run across the width horizontally on the bottom and shelves and vertically up and down the side pieces. The plywood’s grain direction is already correct if it has been precut into these lengthy strips.
To maximize the amount of material you can use while minimizing waste, create a rough-cut diagram. The stretchers and nailer strips are typically made out of scraps after I have first laid out the larger pieces, such as the sides and bottom. If you’re not familiar with these terms, I explain the various components of a cabinet in this article.
Separate Or Integrated?
The bottom component that lifts the box off the ground is the cabinet toe kick. It’s set back 3-4″ from the front of the cabinet and 3-4″ from the bottom. This prevents you from constantly hunching over as you work at the counter by allowing space for your feet.
The cabinet toe kick can be made in one of two ways. You have two options for supporting the cabinet: either you can create a separate platform or incorporate it into the side pieces and create a notch at the bottom.
Instead of incorporating it into the side pieces, I’m creating a separate toe kick platform. This conserves resources because I can almost entirely assemble two base cabinets from a single sheet of plywood! When it comes to installation, a small platform is additionally simpler to level than a large cabinet.
Add 4″ to the height of the side pieces for integrated toe kicks. If you’re making a standard 30″ wide base cabinet, you’ll need to use the other half of the sheet for the bottom.
Label Your Pieces
Particularly if you’re making a lot of cabinet boxes at once, the cabinet box pieces start to resemble one another. Label the pieces as you cut them out to avoid losing your mind trying to figure out where they belong.
I attach a blue painter’s tape with the part name and dimensions to each piece. I know which part goes where even if they are all stacked up in a huge stack on the workbench so I won’t inadvertently use a side piece as the bottom!
Also Read:
FAQs
What Can I Use for a Cabinet Box?
Plywood and particleboard are two popular choices for box construction, which is better? Here are a few hints: Plywood is what cabinet manufacturers use for the boxes of their higher-end cabinets, and many cabinet refacers are hesitant to reface particleboard boxes. Particleboard falls short of plywood in comparison.
What Kind of Plywood Do You Use for Cabinet Boxes?
Most plywood cabinets have a baltic birch plywood core with red oak or maple hardwood. If you want oak or maple plywood, be prepared to spend more money. For the majority of homeowners, birch plywood with a hardwood veneer is a good option.
Do You Paint the Inside of Cabinet Boxes?
Whether or not kitchen cabinets are painted inside is irrelevant. The wood already has protection against oil vapors, so painting inside isn’t necessary. Even though it might be challenging, doing so would liven up a dull kitchen with some eye-catching design. Painting the cabinets is a simple option for remodeling your kitchen.
How Thick Should Cabinet Boxes Be?
Domestic plywood used in cabinetry can be commonly found in thicknesses of 5/32 inch and up, but for the purposes of a frameless cabinet The ideal panel thickness is ANSI HP-1 nominal ¾-inch.
Can a Beginner Make Cabinets Box?
We firmly believe that anything you put your mind and heart to can be accomplished.
And developing new talents and producing amazing work is always enjoyable.
However, you can also build your own cabinets with a little woodworking know-how, a table saw, and a few basic tools.
Is It Cheaper To Build Your Own Cabinets?
Now, if you are starting from scratch without any tools, it might not save you much money.
Having said that, if you already possess some fundamental tools like a saw, a brad nailer, a sander, and a drill, you essentially have everything you need.
You might need a few tools, but if you’re interested in woodworking and want to put money into a good time past time, go for it!
Making your own cabinets will actually save you about 60% of the price.
Is Plywood or MDF Better for Kitchen Cabinets?
If you’ve been following along for a while, you’re aware that we frequently use MDF in our construction endeavors.
MDF may even outperform plywood or solid wood in some cases. MDF is very strong and does not noticeably contract or expand with temperature changes. Additionally, it has a flawless finish devoid of knots or grain.
It’s the ideal material if you want a painted cabinet. On top of that, it costs less than plywood.
In light of this, we decided to use MDF to create our cabinets, though the end pieces of the kitchenette did feature a plywood panel.