In bathrooms, you absolutely need a medicine cabinet. They stylishly add more hidden storage.
You can learn how to install a medicine cabinet by reading this guide. It will cover the installation of a surface mount and recessed medicine cabinet. Into a wall is inserted a recessed medicine cabinet. To the wall studs, a surface mount cabinet is fastened. Discover the best type of bathroom cabinet by reading on.
Table of Contents
What Should You Take Into Account Before Installing A Medicine Cabinet?
The two most common types of medicine cabinets are:
- Surface mount medicine cabinets are wall-mounted. Avoid moving any plumbing or electrical lines that might be in the wall behind it.
- A wall is fitted with a recessed mount medicine cabinet. It looks sleeker and more integrated. In contrast to a surface mount model, it typically has deeper shelves.
Cutting into the wall is necessary for recessed medicine cabinets. Choose a wall without any plumbing or electrical lines behind it if you’re installing a recessed medicine cabinet. The lines will need to be moved if not. It might be simpler to select a surface mount cabinet if there is an outlet on that wall.
A professional should be hired to move plumbing or electrical lines. Call a qualified electrician or plumber to be safe. You could just opt for a surface mount medicine cabinet to save that money.
Typically, medicine cabinets come in sizes up to 60 inches wide and a range of heights. Vanity and sink sizes should be taken into consideration when selecting a size. Remember to leave room for the door to open as well.
A Recessed Medicine Cabinet: How To Install It?
Step 1
The center of the rectangle of framing, which must be free of obstructions, is where a recessed medicine cabinet must be fastened to. Making sure there are no immovable obstacles inside the wall (Step 2) before even purchasing the cabinet is the first step in installing one. A large vent pipe or any load-bearing framing would be more challenging to move out of the way, but electrical wires, studs in a non-load-bearing wall, and occasionally plumbing supply lines can be rerouted. When inspecting the wall, if you come across either of the latter, you should abandon this project and buy a surface-mounted cabinet. Once you have decided on the cabinet you want, the precise location must be decided.
Generally speaking, the cabinet box’s top should be 72 inches off the ground (not including the door trim). But This Old House general contractor Tom Silva is more adaptable. “According to him, the majority of people hang it incorrectly. “You then find yourself gazing more at the ceiling than at yourself.” He advises starting with the 72-inch rule and modifying it to ensure that you can see your face and some of your body in the mirror and still have space to put things on the sink or toothbrush holder below. As most wall framing is set on 16-inch centers, but many medicine cabinets are wider than 18 inches, you’ll probably need to cut a portion of a stud to make space. In order to do this, the stud must not only be cut through, but the fasteners holding it to the wall must also be removed. You can install horizontal and vertical 2×4 blocking to make a frame in which to slide the cabinet once the stud is out of the way. In order to create a strong framework for the cabinet, the blocking is connected to the wall framing that already exists. Once it has been screwed to the framing, all that is left to do is attach the door, slide the shelves in, and fill it with items. The cabinet itself has a lip to overlap the edges of the cut wall.
Step 2: Inspect The Wall Cavity
Mark the wall lightly to indicate the general location where you want the cabinet to hang. Any studs that are contained within this outline can be found using a stud finder.
On either side of those studs, make 4-inch-square holes with a keyhole saw while staying inside the cabinet’s perimeter. To avoid cutting deeper than the drywall and running the risk of running into wires or pipes, keep the saw’s angle shallow.
Take the drywall cutout out. Use a flashlight to illuminate the openings and scan the area for any potential obstacles. If it’s necessary to move wires or pipes, call an electrician or plumber.
Tip: Drive a long screw measuring ½ inch into the drywall in the center of the cutout area before you make the inspection holes. Remove the drywall without damaging it by using the screw as a handle.
Step 3: Mark And Cut The Wall Opening
Have a helper hold the cabinet against the wall so that it is at a convenient height (see the overview for instructions). Look for level and plumb. Draw the cabinet’s outline in pencil onto the wall once you are happy with where it is.
For cutting along the pencil line, use a keyhole saw. Taking care not to damage the remaining wall, remove the drywall inside of your cut line. drywall that is still fastened to the studs may need to be broken off.
Step 4: Cut Through The Drywall Screws
Remove all insulation and lose debris from the opening. Cut through any drywall screws holding the wallboard to the exposed stud by sliding a hacksaw blade behind it with a handle made of tape.
Step 5:cut Out The Wall Stud
Cut the stud flush with the top and bottom openings using a handsaw. Don’t cut through the drywall that is attached to the back edge of the piece. To make the cabinet easier to handle, take the door off. Dry-fit it into the opening. To fix tight spots, use a utility knife and a rasp.
Step 6:install The Blocking
Insert a horizontal 2×4 into the gap. Hold it level, with its end pressed up against the following unharmed wall stud. When cutting it to length, make a mark where it meets the cut stud. To fit the top and bottom, create three more blocking pieces. Put construction adhesive on both ends of the blocking, place it flush with the drywall opening between the studs, and fasten it there. Screws inserted into the drywall and blocking will hold it in place.
Step 7: Install The Blocking
Insert a horizontal 2×4 into the gap. Keep it level and affixed to the following unharmed wall stud with its end. To cut it to length, first mark the spot where it meets the cut stud. To fit the top and bottom, create three more blocking pieces. Place the blocking flush with the drywall opening, between the studs, with construction adhesive applied to both ends. By inserting screws through the drywall and into the blocking, you can keep it in place.
Step 8:mount The Cabinet
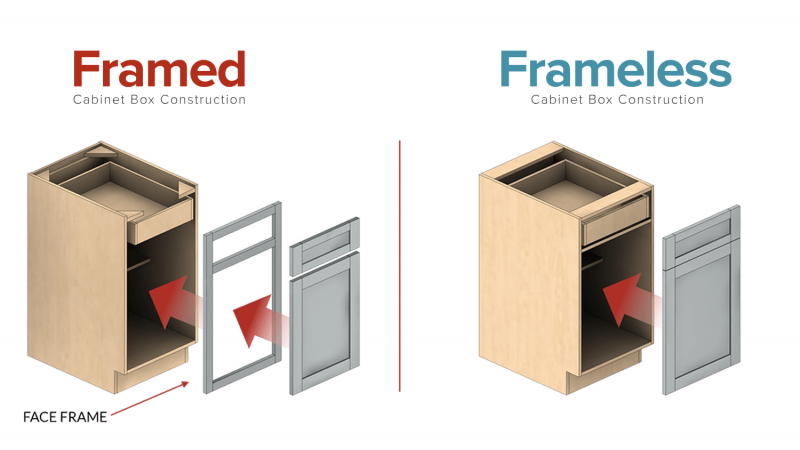
The cabinet should be placed inside the blocking, with the face frame’s edges pressed flush against the wall. Drill drywall screws through the cabinet’s side holes and into the blocking. Caulk the cabinet’s edges if necessary to cover up wall imperfections.
Step 9:assemble The Rest Of The Cabinet
Be careful not to bend the hinges when reattaching the cabinet door. Install the shelves, install any hardware, and then fill the cabinet with contents.
A Surface-mount Medicine Cabinets: How To Install It?
Step 1: The stud finder can be used to locate the studs on your wall. Put a pencil to paper and mark these. To avoid damaging the pipes or wiring inside the wall, seek professional assistance if you are having trouble finding the studs.
Step 2: Take a friend with you for help with this step. Ask them to hold the cabinet against the wall in the desired location. Make sure the cabinet is properly leveled before drawing an outline around it with a pencil.
Step 3: While it is being held against the wall, open the cabinet’s door. Make sure there are no obstacles in the way, especially when opening and closing the cabinet door. You should be able to see the installation holes on the back of the cabinet while the door is open. These holes on the wall should be marked with a pencil.
Step 4: Make sure the hole marks on the cabinet are parallel to the wall studs before removing them (see pencil marks from step 1). Use anchors as support if you’re having trouble aligning the holes with the wall studs. Create pilot holes where they have been indicated.
Step 5: Use a drill to insert the screws into the cabinet’s holes, then mount it to the wall.
If you found this helpful, leave a comment.